Writing User-Defined TSA Checkers. Part 1
Learn how to use TSA for verifying custom properties.
This guide dives into advanced TSA usage. For a gentler introduction to the tool, try our tutorial on the built-in TON drain checker first. However, all concepts are explained here, so you can jump right in if you prefer.
In this tutorial you'll use TSA's custom checker mode to reveal a secret password stored in a live contract on the TON TestNet — and then use it to hack the contract. Along the way you'll learn the core TSA checker API: symbolic variables, assertions, message sending, and getter calls.
Prerequisites
Before starting, make sure you are familiar with:
- The TON blockchain basics: smart contracts, MainNet vs TestNet, addresses, cells and BoC format
- How internal messages are built and sent (message value, source/target addresses, body)
- Basic familiarity with JavaScript, Tact, and FunC
You will need a TestNet wallet with some Toncoins to deploy and interact with a contract. Make sure you have one set up before proceeding — you can get free TestNet coins from the @testgiver_ton_bot Telegram bot.
1. Set Up the Environment
We'll use a Docker image pre-loaded with Java JRE, the FunC/Tact compilers, Node.js, and TSA.
Pull and Run the TSA Docker Image
sudo docker pull ghcr.io/espritoxyz/tsa:latest
sudo docker run --entrypoint bash --workdir /home -it ghcr.io/espritoxyz/tsaAll commands below run inside this container (the "Docker terminal").
Create the Project Directory
mkdir tutorial-1 && cd tutorial-1
npm install @ton/corePrepare Imports
mkdir imports
cp ../tsa.jar .
cp /usr/share/ton/smartcont/stdlib.fc imports/
mkdir imports/lib && cp -r /usr/lib/fift/. imports/lib
cd imports
curl -O https://raw.githubusercontent.com/espritoxyz/tsa/refs/heads/master/tsa-test/src/test/resources/imports/tsa_functions.fc
cd ..Your project should now look like this:
/tutorial-1
├── imports/
│   ├── lib/          # Fift library files
│   ├── stdlib.fc
│   └── tsa_functions.fc
└── tsa.jar
2. The Target Contract
We'll solve the PEEK challenge from Hack the TON.
The contract is locked with a secret password — we need to send an Unlock message with the correct value.
Here is a simplified version of the contract (Tact):
import "@stdlib/deploy";

message Unlock {
  password: Int as uint32;
}

contract PeekLevel with Deployable {
  player: Address;
  nonce: Int;
  password: Int as uint32;
  locked: Bool = true;

  init(player: Address, nonce: Int, password: Int){
    self.player = player;
    self.nonce = nonce;
    self.password = password;
  }

  receive(msg: Unlock) {
    require(msg.password == self.password, "Wrong password.");
    self.locked = false;
  }

  get fun locked(): Bool {
    return self.locked;
  }
}The password is stored in the contract's on-chain state. Our goal is to extract it.
Deploy a Fresh Instance
On the PEEK challenge page, connect your TestNet wallet and click GET NEW INSTANCE. Note the contract address — you'll need it next.
3. Manual Approach: Read the Password From State
Before using TSA, let's see where the password lives. This section is optional but builds useful intuition about on-chain data layout.
Find the Raw Data
Open tonviewer for TestNet, search for your contract address, and go to Code → Raw data. Copy the Hex string.
Parse the Bits
Create read_boc.js:
const { Cell } = require("@ton/core");

const cell = Cell.fromHex(/* YOUR HEX STRING */);
const data = cell.bits;
const bitString = Array.from({ length: data.length }, (_, i) =>
  data.at(i) ? "1" : "0"
).join("");
console.log(bitString);Run it with node read_boc.js.
How to interpret the bits
Tact contracts store fields in declaration order, prefixed by a 1-bit initialization flag:
| Field | Type | Bit length |
|---|---|---|
| init flag | — | 1 |
player | Address | 267 |
nonce | Int | 257 |
password | Int as uint32 | 32 |
locked | Bool | 1 |
Here is the color-coded interpretation of the bit string:
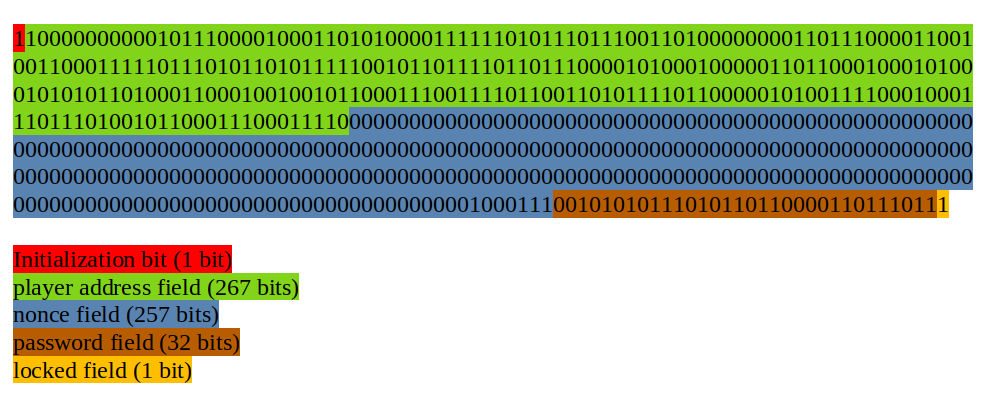
Extract the 32 bits starting at offset 1 + 267 + 257 = 525 and convert to decimal — that's the password.
Knowing the password isn't enough on its own: we also need the opcode that the Tact compiler assigned to the Unlock message.
Since we don't have the compilation report, finding the opcode manually would require decompiling bytecode.
TSA can find both the password and the opcode for us.
4. Download the Contract Code and Data
We need the contract's bytecode and state as .boc files for TSA.
Get the Bytecode
In tonviewer, go to Code → Bytecode → Hex. Copy the hex string.
Get the Raw Data
In tonviewer, go to Code → Raw data → Hex. Copy the hex string.
Save Both as Binary Files
Create save_boc.js:
const fs = require("fs");

const hexString = /* YOUR HEX STRING */;
const filePath = "code.boc"; // change to "data.boc" for the second run
fs.writeFileSync(filePath, Buffer.from(hexString, "hex"));Run twice — once for code, once for data.
5. Write the Checker Contract
How Checkers Work
A checker is a FunC contract with a main() entry point. TSA executes main() and reports any execution that throws an exception.
In other words, TSA finds an example only if it leads to a failure during main(). You encode the property you want to verify as a throw_if — TSA will find inputs that trigger it.
The general structure of a checker contract is:
#include "imports/stdlib.fc";
#include "imports/tsa_functions.fc";

() main() impure {
    ;; Here, we should write all needed constraints
}Abstract example
Suppose we want TSA to find an integer bigger than 7:
() main() impure {
    ;; Create a symbolic 16-bit unsigned integer.
    int x = tsa_mk_int(16, 0);

    ;; Include its value in the report under name "0".
    tsa_fetch_value(x, 0);

    ;; Throw if x > 7 — this is the property we want TSA to satisfy.
    throw_if(256, x > 7);
}tsa_mk_int(bits, signed)creates a symbolic variable (signed:-1, unsigned:0). TSA will try different concrete values for it.tsa_fetch_value(var, name)includes the variable's value in the final report under the given name.
When TSA finds a value (e.g. 8) that triggers the throw_if, it stops and outputs a report:
"fetchedValues": {
    "0": "8"
}Handling preconditions
What if the assertion has preconditions that can themselves fail? By default TSA stops at the first failure it encounters. To skip failing precondition paths and only report failures in the final assertion, wrap preconditions with tsa_forbid_failures() / tsa_allow_failures():
() main() impure {
    ;; Ignore failures in this block — TSA will try other
    ;; instantiations until all preconditions succeed.
    tsa_forbid_failures();

    pre_condition_1
    pre_condition_2
    pre_condition_3

    ;; Re-enable normal failure behavior.
    tsa_allow_failures();

    ;; Only this assertion can trigger a reported failure.
    throw_if(..., assertion_to_check);
}Other key functions
tsa_send_internal_message(contract_id, msg_id)— sends a symbolic message to a contract and includes it in the report undermsg_idtsa_call_n_m(...args, contract_id, method_id)— calls a getter (nreturn values,marguments)
TSA assigns id 0 to the checker contract and id 1 to the first --contract you pass on the command line.
The Checker
In /home/tutorial-1, create a file named checker.fc:
#include "imports/stdlib.fc";
#include "imports/tsa_functions.fc";

() locked() method_id { }

int id_locked() asm "locked PUSHINT";

() main() impure {
    tsa_forbid_failures();

    ;; Send a symbolic message to the PeekLevel contract (id 1).
    ;; The message contents will appear in the report under name "0".
    tsa_send_internal_message(1, 0);

    ;; Call the `locked` getter and store the result.
    int locked_val = tsa_call_1_0(1, id_locked());

    tsa_allow_failures();

    ;; Throw if the contract is now unlocked — this is the property we want TSA to satisfy.
    throw_if(256, locked_val == 0);
}The checker asks TSA: "Find me a message that, after being sent to the contract, causes the locked getter to return false."
How id_locked() computes the getter id
When Tact doesn't declare an explicit getter id, it uses the formula (crc16(name) & 0xffff) | 0x10000.
The FunC compiler uses the same formula for method_id declarations.
By declaring an empty () locked() method_id { }, we make the FunC compiler compute the same id.
The assembly function int id_locked() asm "locked PUSHINT"; then returns that computed id.
If the getter had an explicit id (e.g. get(88503) fun locked()), you'd simply write tsa_call_1_0(1, 88503).
6. Run TSA
java -jar tsa.jar custom-checker \
  --checker checker.fc \
  --contract boc code.boc \
  --data data.boc \
  --fift-std imports/lib \
-o report.sarif| Flag | Meaning |
|---|---|
--checker checker.fc | The checker contract (id 0) |
--contract boc code.boc | The target contract in BoC format (id 1) |
--data data.boc | Initial contract state |
--fift-std imports/lib | Fift library path |
-o report.sarif | Output report file |
7. Interpret the Report
Open report.sarif. A successful finding looks like:
"message": {
    "text": "TvmFailure(exit=TVM user defined error with exit code 256, phase=COMPUTE_PHASE)"
}This means TSA found a message that unlocks the contract. Look under "properties" → "additionalInputs" → "msgBody" → "data" for the message body bits.
The first 64 bits of the body contain:
- Bits 0–31: the opcode (e.g.
563403406) - Bits 32–63: the password (e.g.
720069051)
This password matches the one we found manually in Section 3.
8. Hack the Contract
Now send the unlock message via tonviewer:
Open the Contract in TonViewer
Go to testnet.tonviewer.com, search for your contract address, and open the Send Message tab.
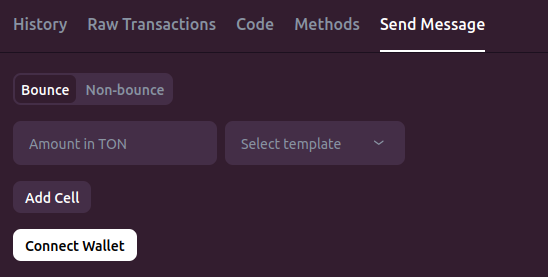
Connect Your Wallet
Click Connect wallet and link your TestNet wallet. A successful connection is indicated in the top-right corner of tonviewer.

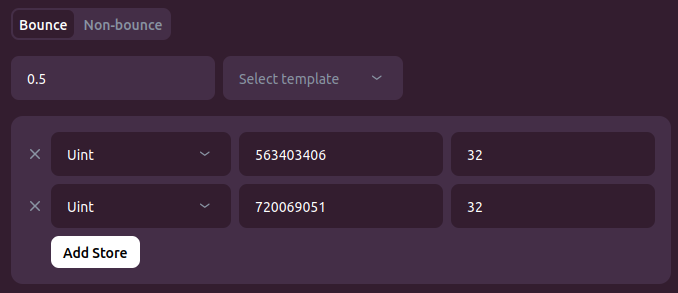
Build the Message
Leave the default Bounce option selected. Set Amount to 0.5 TON. Click Add cell — this cell is the message body.
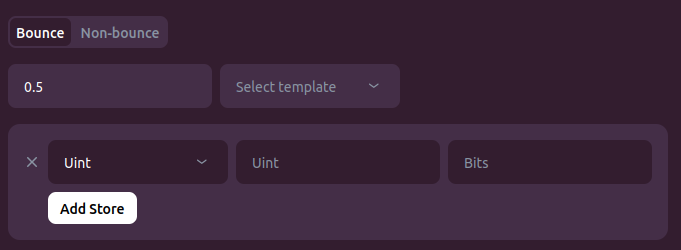
For the first field, select Uint, enter value 563403406 (the opcode), size 32. Click Add Store to add a second field.
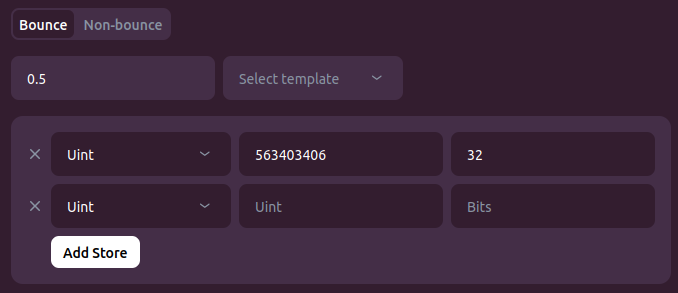
For the second field, select Uint, enter value 720069051 (the password — use yours), size 32.
Send and Verify
Click Send Message and confirm the transaction in your wallet. Wait a couple of seconds, then go to the Methods tab.
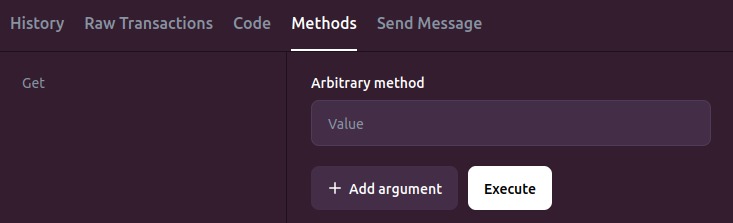
Type locked in the Arbitrary method field and click Execute.
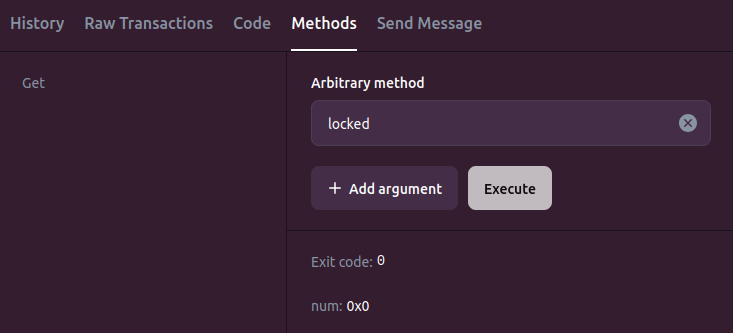
Exit code 0 means the getter executed successfully. num: 0x0 means the getter returned false — the contract is unlocked!
Conclusion
In this tutorial you've:
- Learned how TSA's custom checker mode works: symbolic variables, assertions, and the
throw_ifpattern - Written a checker that finds a message satisfying a desired post-condition
- Used TSA to discover both the opcode and password of a live contract
- Successfully hacked the contract on the TestNet
In Part 2, we'll use checkers to find bugs in contract implementations by verifying invariants.